Table of Contents
ToggleA Shark robot vacuum should clean your floors on schedule, then dock itself, no fuss. When yours keeps stopping mid-cycle, it’s frustrating, but the good news is that most stoppages come down to simple maintenance or a quick reset. You don’t need to be tech-savvy to troubleshoot the issue: a few basic checks and cleanings often get your vacuum running smoothly again. This guide walks through the most common culprits, from clogged filters to sensor issues, and shows you exactly how to fix them before calling for professional help.
Key Takeaways
- When your Shark robot vacuum keeps stopping mid-cycle, start with the simplest fixes: emptying the dustbin and replacing clogged filters, which solve nine out of ten stoppages.
- Inspect and clean the main brush roller, wheels, and cliff detection sensors regularly—tangled hair and dust buildup are common culprits that prevent the vacuum from completing its cleaning cycle.
- Verify your charging dock connection by cleaning metal contact points on both the vacuum and dock, and ensure the dock sits on a level surface with proper clearance to avoid power and communication issues.
- Run a factory reset and update your Shark app and firmware to clear software glitches that can cause unexpected shutdowns even when hardware is functioning properly.
- If your Shark vacuum still stops after cleaning, maintenance, and software updates, the issue likely requires professional support—contact Shark customer service with your model and serial number ready.
Common Reasons Your Shark Vacuum Is Stopping Mid-Cycle
Shark robot vacuums stop for a handful of predictable reasons. A full or blocked dustbin triggers the vacuum to halt before it overflows, this is a safety feature, but it’s also the most common culprit. Dirty filters restrict airflow, forcing the motor to work harder until it shuts down to prevent overheating. Tangled brushes clogged with hair and debris starve the cleaning head of power, and cliff detection sensors (which prevent the vacuum from tumbling down stairs) can malfunction if covered in dust.
Wheels stuck on carpet edges, thick rugs, or wrapped hair prevent the vacuum from moving, and it’ll stop rather than force itself forward. Battery issues, whether the unit isn’t charging fully or the battery has degraded, also trigger unexpected shutdowns. A loose or misaligned charging dock connection means the vacuum can’t dock properly or charge between cycles. Finally, app glitches or outdated firmware can cause the vacuum to stop even if hardware is fine. Start with the simplest checks first: dustbin and filters. Nine times out of ten, that’s your answer.
Clean the Dustbin and Check For Blockages
Before doing anything else, empty the dustbin. This is where most problems start. Remove the dustbin from the vacuum, open the dump door, and tap out debris over a trash can. Use your fingers or a small brush to clear matted dust from the walls inside the bin, this buildup reduces suction and triggers the “full” sensor even when the bin looks half-full.
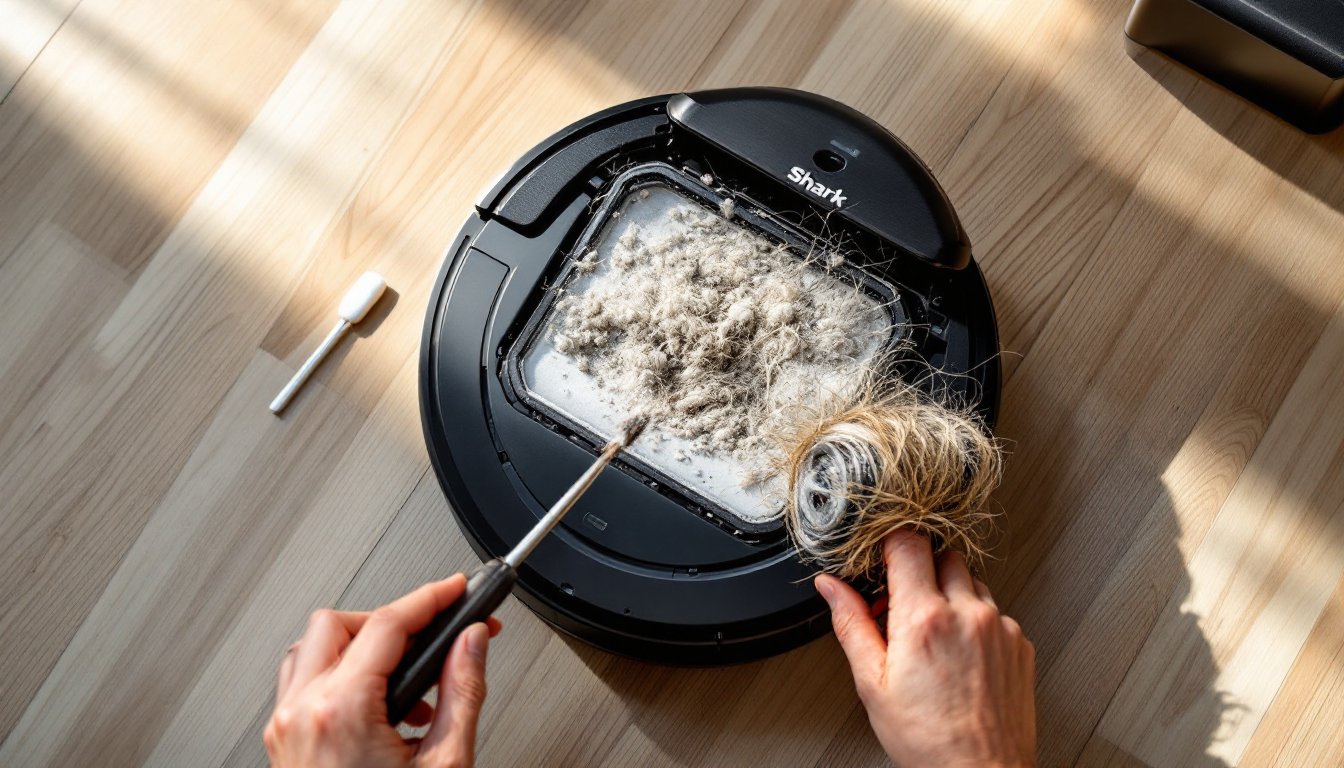
Next, inspect the intake path. Flip the vacuum upside down and look at the brush roller and the channel running from the brush head to the motor. Hair wraps around the brush bristles and collects in the intake tube, especially if you have pets or longer hair in your home. Use a flathead screwdriver or a small scissors tool to carefully cut and pull out tangled strands. Look inside the intake channel for compressed debris blocking airflow. A flashlight helps here.
Check the filter while you’re at it. Most Shark models use a HEPA filter in the dustbin lid. Tap it gently over the trash to dislodge dust, then hold it up to a light source. If you can’t see light through the filter, it’s clogged and needs replacement, not just cleaning. A clogged filter is the second most common reason for mid-cycle shutdowns. Running the vacuum on a full filter forces the motor to overheat, triggering a thermal shutdown to protect the unit. Replace the filter according to your model’s manual, usually every 1-3 months depending on usage.
Examine and Replace the Brushes and Filters
The main brush roller deserves close attention. This brush sits at the base of the vacuum and spins to pull dirt into the intake. Hair, thread, and carpet fibers wrap around it, and if left unchecked, the motor driving the brush works harder and eventually shuts down. Flip the vacuum over and look at the brush ends. You should see small snap clips or screws holding the brush shaft in place, remove them and slide the brush out. Use scissors to cut away any hair wound around the brush, then wipe it down with a dry cloth. Reinstall it and make sure both ends snap firmly into place.
Many Shark models also have a side brush (a smaller brush on the side of the cleaning head). It rotates to sweep debris toward the main brush. This side brush is more prone to jamming on thick rug edges or getting fouled by pet hair. Check it the same way: remove it, clear any obstruction, and reinstall it securely.
For filters, you likely have both a pre-filter (foam or mesh) and the main HEPA filter. The pre-filter is the first line of defense and gets dirtier faster. Clean the pre-filter every 1-2 weeks by tapping it out and rinsing it gently under lukewarm water if your manual allows. Let it dry completely before reinstalling. Replace the main HEPA filter every 2-3 months or when you see visible dust clinging to it. Using a vacuum with clogged filters doesn’t just cause stoppages, it reduces suction and cleaning performance overall.
Inspect the Wheels and Cliff Detection Sensors
Wheels get bound up more often than most people realize. Flip the vacuum and spin each wheel by hand, it should rotate freely. Hair, string, and carpet fibers twist around the wheel axles, preventing the vacuum from moving. Use scissors to cut away any wrapped material. If the wheel still doesn’t spin smoothly, check that the axle isn’t bent. A bent axle usually means the wheel assembly needs replacement, which is inexpensive and straightforward.
Cliff detection sensors sit on the underside of the vacuum and use infrared light to detect stairs and drop-offs. They keep the vacuum from tumbling downstairs, a critical safety feature. When these sensors get dusty or blocked, the vacuum thinks it’s at a cliff edge and stops. Look at the underside where you’d expect to find small dome sensors (usually three to four of them). Use a damp cotton swab to gently clean the lenses. Don’t use water on the sensors themselves: just dampen the swab slightly. Let them air-dry for a minute, then test the vacuum on a flat, obstacle-free floor.
If the vacuum still stops in the middle of the room away from stairs, the sensors might be malfunctioning. A sensor failure typically requires replacement, which your retailer or manufacturer can handle. But, always rule out dust buildup first, it’s the easiest fix.
Verify Battery Health and Charging Dock Connection
The vacuum’s battery degrades over time, and a worn battery can’t hold a charge long enough to complete a full cycle. If your vacuum runs for 20–30 minutes and then stops, even on a small room, the battery is likely the culprit. Let the vacuum charge for a full 3-4 hours on the dock without interruption. Some models need an initial 18-hour charge before their first use.
Next, inspect the charging dock connection. Look at the metal contact points on the vacuum’s underside where it touches the dock. They should be clean and shiny, not covered in dust or corrosion. Use a dry cloth or a slightly damp cotton swab to wipe the contacts clean. Then check the dock itself: the metal pins inside the dock should also be clean. Over time, dust settles on these contacts, preventing proper charging or communication between the dock and the vacuum.
Make sure the dock is placed on a hard, level surface with at least 4 feet of clearance on either side and 1.5 feet behind it. A dock wedged in a corner or sitting on thick carpet creates alignment problems. The vacuum may fail to dock properly or lose contact mid-charge. If you’ve cleaned the contacts and repositioned the dock and the vacuum still stops frequently after a short run, the battery is likely end-of-life and needs replacement. Replacement batteries are usually available from the manufacturer or online retailers.
Reset Your Shark Vacuum and Update the App
Software glitches can cause the vacuum to stop even when hardware is fine. A factory reset clears corrupted settings and often restores normal operation. The reset process varies by model, but most Shark vacuums have a reset button on the underside or you can hold the power button for 10–15 seconds. Check your manual for your specific model. After a reset, the vacuum needs to be set up fresh, which means re-adding your Wi-Fi network and linking it to the app.
Next, check the app itself. Open your Shark app and look for an update notification. Outdated app versions sometimes lose compatibility with the vacuum’s firmware, causing communication errors that trigger unexpected shutdowns. Update the app through your device’s app store, then open it and pair the vacuum again if prompted. Smart home integrations (Alexa, Google Home) can also cause stoppages if the connection is unstable. Temporarily disable any automation routines tied to your vacuum and test whether it stops mid-cycle when running manually.
If the vacuum has a firmware update available, the app will usually notify you. Don’t skip these updates, they often include fixes for known stopping issues. Plug the vacuum in and let any pending firmware updates install without interruption. Restart the vacuum and app after updating, then run a test cycle on a small area.
When to Call Professional Support or Replace Your Unit
If you’ve cleaned the dustbin and filters, cleared the brushes, wiped the sensors and charging contacts, reset the unit, and updated the app, and the vacuum still stops mid-cycle, it’s time to contact Shark customer support or a professional technician. At that point, the issue is likely a failing motor, a defective sensor, or a corrupted circuit board that requires professional diagnosis.
Before calling, have your vacuum’s model number and serial number (usually printed on the underside or in the app) ready. Shark support is generally responsive and can often walk you through additional troubleshooting steps tailored to your specific model. Many manufacturer warranties cover parts replacement for 1-2 years, and customer service can arrange repairs or provide a replacement unit.
Reviews from tech product evaluation sources often compare robot vacuum reliability over time, and smart home technology guides frequently test durability and long-term performance. If your vacuum is out of warranty and repairs are expensive, a newer model might be more cost-effective. Modern robot vacuums are significantly more reliable than models from 5+ years ago. Budget-friendly options exist alongside premium models, so shop around based on your home size and pet situation before deciding to replace.