
Table of Contents
ToggleA standing desk isn’t just a trendy office upgrade, it’s a practical investment in health and posture. But buying the desk is only half the battle: mounting it properly determines whether you get years of stable, ergonomic use or a wobbling workspace that leaves your back aching. Whether you’re installing a wall-mounted adjustable model or anchoring a stationary standing desk to a home office wall, getting the fundamentals right matters. This guide walks you through assessing your wall, gathering the right tools, and completing a rock-solid installation that supports both your work and your well-being.
Key Takeaways
- Proper mounting of a standing desk ensures stability and ergonomic alignment, reducing strain on your neck, shoulders, and back while preventing dangerous tipping hazards.
- Always mount directly to wall studs (which safely support 80–100 pounds with proper 3-inch wood screws) rather than relying on toggle bolts or expansion anchors alone for load-bearing capacity.
- Gather all tools and materials before starting—including a stud finder, level, drill, pilot bits, and appropriate fasteners—to avoid delays and ensure a professional installation.
- Use a level to mark horizontal reference lines, verify stud locations with pencil marks, and double-check all measurements before drilling to ensure your mounting bracket sits flush and level.
- Test stability by applying gentle downward pressure on all edges before adding weight, then load your desk gradually while keeping heavy items centered on the mounting brackets to maintain balance.
- Periodically re-tighten bolts and verify levelness throughout the year, as wood shrinks and expands with temperature changes, which can cause fasteners to loosen over time.
Why A Properly Mounted Standing Desk Matters
A flimsy standing desk installation doesn’t just feel unstable, it defeats the entire purpose. When a desk shifts, sways, or creaks under the weight of a monitor, keyboard, and paperwork, you unconsciously lean back or brace yourself, reintroducing the postural problems a standing desk is meant to solve.
Proper mounting ensures your workspace stays rigid, your keyboard stays at elbow height, and your screen remains at eye level. This alignment reduces strain on your neck, shoulders, and lower back, especially during long work sessions. A well-mounted desk also protects your wall from damage and prevents expensive repairs down the line.
Second, mounting matters for safety. An unsecured desk can tip, especially if weight distributes unevenly or if someone leans on a corner. With a young family at home, that’s not a risk worth taking. A properly anchored standing desk remains exactly where you put it, day after day.
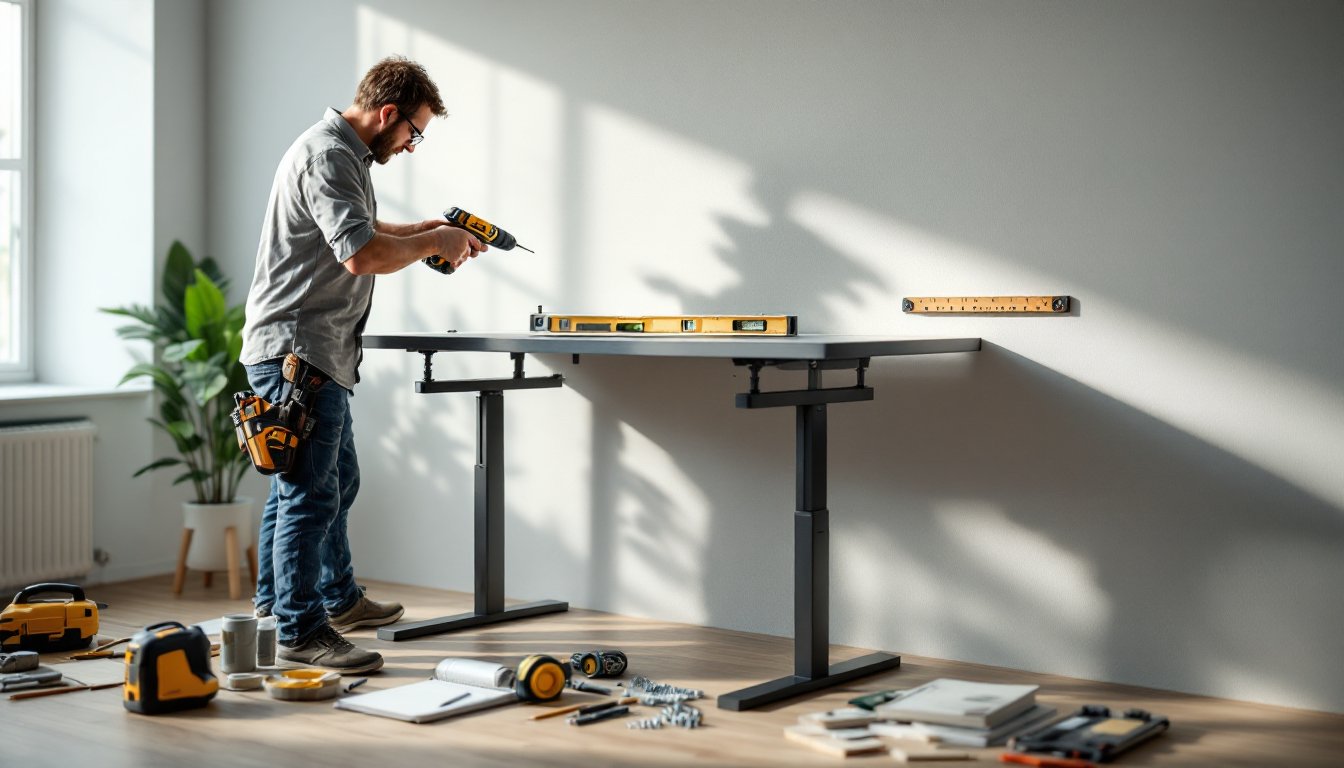
Tools And Materials You’ll Need
Before you fire up a drill, gather everything on hand. Running back and forth to the garage wastes time and breaks focus.
Tools:
- Stud finder (magnetic or electronic: electronic finds studs more reliably through paint and drywall)
- Drill-driver with mixing paddle attachment
- 1/4-inch drill bit and 1/8-inch pilot bit
- Level (at least 24 inches for accuracy)
- Tape measure
- Pencil for marking
- Socket set or wrench (if your desk uses bolted connections)
- Safety glasses and work gloves
Materials:
- Wall anchors or toggle bolts (if mounting between studs)
- 3/8-inch wood screws rated for your wall type (usually #10 or #12 gauge, 2.5 to 3 inches long)
- The standing desk mounting bracket kit (should come with hardware: verify bolt sizes before drilling)
- Shims (thin wood wedges) for leveling, if needed
Read your desk’s manual first. Some mounting systems use lag bolts, others use through-bolts. The hardware provided matters, don’t substitute cheaper anchors and expect the same load-bearing capacity.
Choosing The Right Wall Or Surface For Your Desk
Not every wall in your home is load-bearing. Drywall alone won’t hold a standing desk safely: it needs solid backing.
Assessing Wall Strength And Finding Studs
Start by figuring out what’s behind your drywall. Press on different spots along the wall, you’ll feel resistance at studs (typically spaced 16 inches or 24 inches apart on center). A stud finder removes the guesswork: mark studs with light pencil lines once you’ve located them.
If possible, mount your desk brackets directly to studs. A single stud can safely support 80–100 pounds when using proper 3-inch wood screws. If your ideal desk location doesn’t align with a stud, heavy-duty toggle bolts or expansion anchors rated for drywall can work, but they’re weaker. Never rely on toggle bolts alone for a desk that’ll support a monitor, keyboard, and desktop items.
Check your desk’s weight specifications and typical load (monitor, keyboard, papers). Most standing desks weigh 30–60 pounds on their own, plus 20–40 pounds of equipment. Add another 10–20 pounds for daily items. Your mounting system should support at least 150 pounds comfortably.
For interior walls separating rooms, use a stud finder to verify framing. Exterior walls have additional insulation and sometimes different stud spacing due to historical construction. If you’re unsure, consult local building codes or a contractor.
Step-By-Step Mounting Installation Process
Marking, Drilling, And Anchoring Your Mounting Hardware
Step 1: Mark Your Line
Use a level to draw a light horizontal pencil line where the desk bracket’s top or centerline should sit. Check that the line is truly level in multiple spots: a tilted desk is uncomfortable and looks sloppy. Mark the stud locations on this line with small pencil dots.
Step 2: Locate And Mark Drill Points
On most standing desk brackets, mounting holes are pre-drilled and spaced 16–20 inches apart horizontally. Align these holes with your marked line and studs. Use your tape measure to double-check spacing: a few millimeters off and your bracket won’t sit flush.
Step 3: Drill Pilot Holes
Use a 1/8-inch pilot bit (slightly smaller than your mounting screws) to drill into studs. Drill straight, not at an angle, or your screw won’t seat properly. If drilling between studs, drill through the drywall for your toggle bolts or expansion anchors. Blow out dust with a hand vacuum or compressed air: debris prevents bolts from seating fully.
Step 4: Install Mounting Hardware
If using wood screws into studs, drive 3-inch #10 or #12 gauge screws directly into pilot holes. If using toggle bolts between studs, insert the bolt through the bracket hole, push it through the drywall hole, and turn the toggle wings counterclockwise until they grip the backside of the drywall. Hand-tighten only: over-tightening strips threads.
Step 5: Check Level Again
Once brackets are installed, place your level on the mounting surface and verify it’s perfectly horizontal. If not, use shims (thin wood wedges) under the desk base to compensate. Uneven desks lead to equipment sliding and long-term back discomfort.
Resources like Family Handyman offer detailed photo walkthroughs for wall-mounted furniture if you want a visual reference. Tight tolerances matter here: take your time.
Ensuring Stability And Proper Weight Distribution
Installation is complete, but stability requires a few final checks.
Test before load:
Before placing your monitor or laptop on the desk, put gentle downward pressure on all edges and corners. There should be zero flex or creaking. If you feel any movement, stop and re-tighten bolts. Check that all fasteners are hand-tight (snug but not over-torqued).
Add weight gradually:
Place your keyboard and mouse first, then the monitor. A top-heavy desk (monitor high, light base) feels less stable than a balanced load. Center your heaviest item on the mounting brackets, not at the edges.
Inspect periodically:
After a week of use, re-check bolt tightness. Wood shrinks and expands with humidity and temperature changes: fasteners can loosen over time. Tighten any bolts that’ve backed off. Once or twice a year, re-verify levelness with your level and re-tighten mounting hardware as part of seasonal home maintenance.
If wobbling persists:
Wobble after proper installation usually means underestimated load or a stud finder error. If you suspect you missed a stud, use a flashlight to peek behind the desk or drill a small test hole higher or lower to locate framing. A professional stud finder ($20–$60) is cheaper and less frustrating than guessing.
Building projects like Instructables often feature user photos and comments from people who’ve tackled similar installations, useful if you hit an unexpected hitch. Don’t hesitate to ask: someone’s solved your problem before.
